To begin the process of adding contributions, click the Add Contributions Quick Links button on the Dashboard or from the Left-Hand Menu.


Once selected, the Add Contributions screen opens.
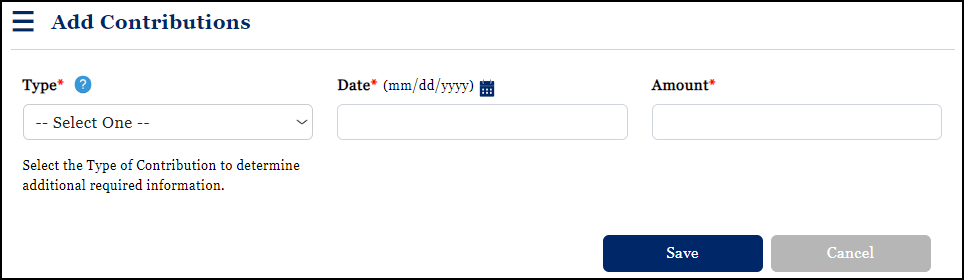
When adding a contribution, a specific contribution type must be selected. Descriptions for the contributions types are available onscreen via the Help tool and appear here as well.
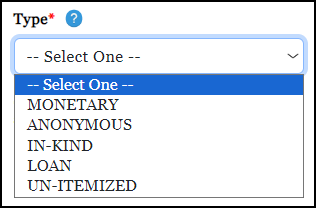
•Monetary: Contributions of money, whether cash, check, etc.
•Anonymous: Anonymous contributions are those contributions whose origins cannot be determined, i.e., "pass the hat" contributions. An anonymous contribution does not mean a contributor may make a donation with the understanding the contributor's name will not be reported.
•In-Kind: Goods and services in place of cash. For example, someone purchases stamps for a mailing and donates the stamps; this is an in-kind contribution.
•Loan: Money lent usually for the borrower's temporary use.
•Un-Itemized: Receipts under $100.00. For example, you have a chili dinner. Tickets are $10.00 each and you sell 500 tickets. You may report these in aggregate here by reporting $5,000.00.
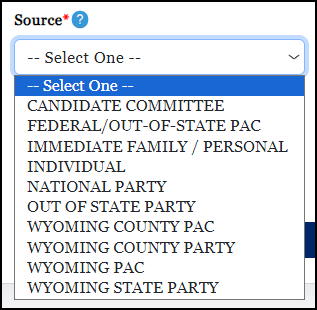
The screen dynamically adjusts to present the user with fields appropriate to the Type of contribution selected. If the user selects a Type of Monetary, In-Kind, or Loan they will be required to select an appropriate Source. Descriptions for the contribution sources can be found under the onscreen Help tool and are self-explanatory.
Once a Source is selected, the user is presented with the fields appropriate to the contribution type and source.

The fields Business Area and Interest Group are optional fields and are provided here in anticipation of future needs.
Once data entry is complete, the user simply selects Save. The contribution can then be found by Searching for all contributions from the View Contributions main screen.